Goals and Background
This lab will demonstrate how to use Hypertext Markup Language (HTML), cascading style sheets (CSS), and JavaScript to code a custom webpage. All three languages will be used concurrently to create two separate web pages. Both webpages will be similar. The first webpage will be created by following a detailed list of instructions explaining the code. This will be explained in more depth in part one below. The second webpage will be created by using the code from first webpage as an example to design a hypothetical GIS company's website devised by the author. This webpage will include the following 8 features:
1. The name of the company
2. The company logo
3. Links to resources that will be useful to the company
4. Links to the Historic Earthquakes and Hurricanes web app created in lab 3
4. Links to the Historic Earthquakes and Hurricanes web app created in lab 3
5. Two non-secure links to web apps from the Esri JavaScript website
6. An ordered list of six services which the proposed company will provide
7. A form which will allow users of the webpage to search the proposed companies
8. Three pictures which are important for the company
Methods
Part 1: Creating a Webpage with HTML, CSS, and JavaScript
Step 1: Create and Design the webpage using HTMLFirst, the title and header of the webpage where created. The title of a webpage is what is shown in the reserve bar at the top of a window. Example titles are shown below in figure 4.0. The title of web page is important because it is what the end-user will use to search for the webpage in a search engine such as Google or Bing. The name of the title given to this webpage is My Test Page.
 |
| Fig 4.0: Example of Webpage titles |
 |
| Fig 4.1: Coding the Header and Title in HTML |
Next, a new div was created assigned with an ID of "main". Then, an entry form was designed along with some introductory text for it. This form is an input form which will allows the end-user to enter in comments about the webpage. The code for this can be seen below in figure 4.2. There are many attributes located in this block of code. Attributes provide information about an html tag. They also help to format the tag. For example, the type attribute can be given many different values including Submit, Text, and, Radio. Each way will change the way end-users enter data into the form. The form type and value for this webpage is assigned to Submit.
The next block of code for the HTML index file is shown below in figure 4.3. The code creates a list of the hobbies of the author. To make the list, the unordered list tag <ul> is used with each hobby listed within a list tag <li>. Line 30 of the code includes a non breaking space paragraph.
Figure 4.4 shows the last block of code in the HTML file. One can enlarge the image by clicking on the figure. The first part of this code provides some intro text and a link to the universities geography and anthropology homepage. Then, a results box is coded which will be coded and styled more in the JavaScript and CSS files. Next, a picture of the Historic Earthquakes and Hurricanes lab is inserted into the webpage. A link to the web app is also given. Then, an updated line and code reference line is added to the file. Lastly, the JavaScript file is referenced using the script tag for the results box.
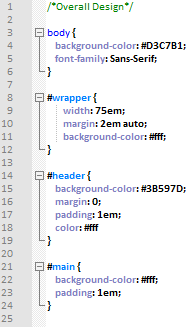
Step 2: Add CSS to the webpage
Figures 4.5 and 4.6 shows how CSS was used to style the webpage. The CSS document is referenced in the HTML a couple different ways. The main way to reference it is to create an ID within a div. Also, a whole tag can be referenced such as the body tag displayed in line 3. To connect the CSS with the ID in the HTML document the # symbol is used. The properties assigned to the divs are mostly self explanatory, but the values are not. Color hex codes were used to code color. This makes each color easily identifiable. For the size of properties, either a px value or an em value was used. Px values determines the size in terms of pixels while em values are relative compared to the size of text or spacing around them. Without the use of CSS, the webpage will look very bland as it will only be in black and white.
Step 3: Add JavaScript to the webpage
To make this first webpage fully functional, lastly, the JavaScript was coded. This can be seen below in figure 4.7. In the code is a simple function which is used to display text in the results box in the webpage. There are three variables created for it. The first variable is used to to find the the location of the results box within the HTML file, the second variable creates a new paragraph for the expressed results, and the third variable creates a text node to put inside the newly created paragraph. Lastly, the variables are assembled together to aggregate all three of the variables tasks and the text to be displayed in the results box are displayed in line 18.
 |
| Fig 4.2: Main div, and Simple Form HTML Code Block |
 |
| Figure 4.3: Unordered List of Hobbies |
 |
| Fig 4.4: Results Box, Earthquakes and Hurricanes App Insert, and Code Reference |
Step 2: Add CSS to the webpage
Figures 4.5 and 4.6 shows how CSS was used to style the webpage. The CSS document is referenced in the HTML a couple different ways. The main way to reference it is to create an ID within a div. Also, a whole tag can be referenced such as the body tag displayed in line 3. To connect the CSS with the ID in the HTML document the # symbol is used. The properties assigned to the divs are mostly self explanatory, but the values are not. Color hex codes were used to code color. This makes each color easily identifiable. For the size of properties, either a px value or an em value was used. Px values determines the size in terms of pixels while em values are relative compared to the size of text or spacing around them. Without the use of CSS, the webpage will look very bland as it will only be in black and white.
 |
| Fig 4.6: CSS for HTML |
 |
| Fig 4.5: CSS for HTML |
Step 3: Add JavaScript to the webpage
To make this first webpage fully functional, lastly, the JavaScript was coded. This can be seen below in figure 4.7. In the code is a simple function which is used to display text in the results box in the webpage. There are three variables created for it. The first variable is used to to find the the location of the results box within the HTML file, the second variable creates a new paragraph for the expressed results, and the third variable creates a text node to put inside the newly created paragraph. Lastly, the variables are assembled together to aggregate all three of the variables tasks and the text to be displayed in the results box are displayed in line 18.
 |
| Fig 4.7: JavaScript Used for the Results Box |
Part 2: Creating a Webpage for Sunny Side GIS
The hypothetical company created for this lab is Sunny Side GIS. This companies goal is to educate people about the uses and applications of GIS.
Step 1: Design the Webpage using HTML
Figure 4.8 shows the first half of the HTML code for the Sunny Side GIS's webpage. The outline of this webpage is very similar to that of the web page created in part 1 of this lab. The code below creates a result box to display some text, a title for the webpage, a customized header with the name of the company, their mission statement, and their logo, and an unordered list which includes links for which people trying to learn and apply GIS will find useful.
 |
| Fig 4.8: Header, Title, and an Unordered list of Resources |
The second half of the HTML code is displayed below in figure 4.9. This code starts off by providing a few links for the end user for two of Esri's Web GIS applications and to the Historic Earthquakes and Hurricanes web app created in lab 3. After that, an ordered list of services of which Sunny Side GIS provides is coded. These are services which a customer can use to further their GIS skills. Next, a search form is inserted so that users will be able to enter text in search bar to look for content within the webpage. Lastly, the JavaScript file is attached to the document so it can be referenced for the results box.
 |
| Fig 4.9: Coding Useful Links, Services, and a Search Form in to the Webpage |
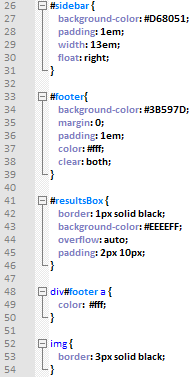
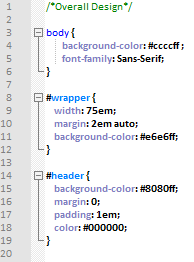
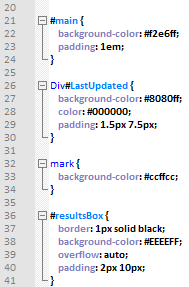
Step 2: Add CSS to the webpage
Figures 4.10 and 4.11 display the CSS used to style the webpage. Both class selectors and ID selectors are used. Similar to part 1, color hex codes were used to code colors and em and px were used to define the size for text and spacing.
Figures 4.10 and 4.11 display the CSS used to style the webpage. Both class selectors and ID selectors are used. Similar to part 1, color hex codes were used to code colors and em and px were used to define the size for text and spacing.
 |
| Fig 4.10: CSS Used for Styling |
 |
| Fig 4.11: CSS Used for Styling |
Step 3: Add JavaScript to the webpage
Figure 4.12 displays the JavaScript used to format the results box. This function is identical to the one used in part 1 displayed in figure 4.7 with the exception of the returned results. Therefore the function as identical flow as in part 1.
Figure 4.12 displays the JavaScript used to format the results box. This function is identical to the one used in part 1 displayed in figure 4.7 with the exception of the returned results. Therefore the function as identical flow as in part 1.
 |
| Fig 4.12: JavaScript Used for the Results Box |
Results
Figure 4.14 shows the results of part one. All of the text with the exception of the results box is a result of the HTML code. The html code also breaks up the web page into many different sections by using the div tag. This is shown below through use of a wrapper around the body of the webpage, a header which displays the UWEC logo and some introductory information about the webpage, a main area of the document where most of the information is displayed, and a footer which includes the references for the code. The overall layout is fairly simple. The CSS is used to add all of the colors and formatting to the document while the JavaScript is used to place text inside of the result box.
 |
| Fig 4.14: My First Web Page Development Exercise |
 |
| Fig 4.15: Sunny Side GIS Webpage |
Sources
UWEC logo [University of Wisconsin's Eau Claire Logo]. (n.d.) Retrieved October 25, 2017, from uwec.edu
W3Schools Online Web Tutorials. (n.d.). Retrived October 25, 2017, from https://www.w3schools.com/default.asp
Wilson, C. (2017). Lab 4 HTML, CSS, and JavaScript https://drive.google.com/file/d/0B1RJN5un8yU8ZUwtWnpZRksxTmM/view?usp=sharing
No comments:
Post a Comment